Installing Tomcat 10 on cPanel - AlmaLinux
Official documentation: https://docs.cpanel.net/ea4/containers/easyapache-4-containers/#almalinux-and-rocky-linux https://docs.cpanel.net/ea4/containers/tomcat-via-containers/
First, log in via SSH using the cPanel account credentials. Do not use su or sudo.
Run this command to install ea-tomcat as a container:
/usr/local/cpanel/scripts/ea-podman install ea-tomcat101
This will create the applications directory at:
/home/usuarioCpanel/ea-podman.d/nombre-de-container
E.g.: /home/tomcattest/ea-podman.d/ea-tomcat101.tomcattest.01
Running any of the following commands will obtain the container name:
/usr/local/cpanel/scripts/ea-podman containers
/usr/local/cpanel/scripts/ea-podman registered
[tomcattest]$ /usr/local/cpanel/scripts/ea-podman containers
{
   "ea-tomcat101.tomcattest.01" : {
      "container_name" : "ea-tomcat101.tomcattest.01",
      "image" : "tomcat:10.1.24",
      "pkg" : "ea-tomcat101",
      "pkg_version" : "10.1.24-1",
      "user" : "tomcattest"
   }
}
Running the following command will obtain the container name and its ports:
/usr/local/cpanel/scripts/ea-podman running
[tomcattest]$ /usr/local/cpanel/scripts/ea-podman running
{
   "ea-tomcat101.tomcattest.01" : {
      "image" : "docker.io/library/tomcat:10.1.24\n",
      "ports" : [
         "10000",
         "10001"
      ]
   }
}
For example, a container can be named: ea-tomcat101.miusuariocpanel.01
You must use that name to run any Tomcat command for this user.
Inside the directory /home/usuarioCpanel/ea-podman.d/nombre-de-container
the most important directories are:
/conf Where the server.xml file and other configuration files are located.
/logs Where logs are stored.
/webapps/ROOT Where Java application files should be uploaded.
To verify that Tomcat works we can create an index.jsp file inside the \n**/webapps/ROOT** directory mentioned above, and add this content:
<html><body>
<% out.println("Hello world! -- From JSP"); %>
</body></html>
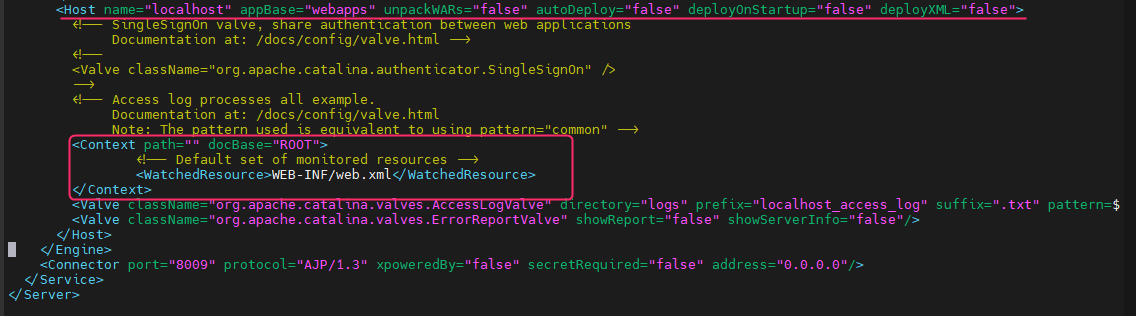
Then, we must add the following code in /conf/server.xml in the section where it reads:
<Host name="localhost" appBase="webapps" unpackWARs="false" autoDeploy="false" deployOnStartup="false" deployXML="false">
Add:
<Context path="" docBase="ROOT">
         <!-- Default set of monitored resources -->
         <WatchedResource>WEB-INF/web.xml</WatchedResource>
</Context>
Then you must restart the Tomcat container:
/usr/local/cpanel/scripts/ea-podman restart nombre-de-container
EX: /usr/local/cpanel/scripts/ea-podman restart ea-tomcat101.tomcattest.01
It is important to know which ports were assigned to the installed Tomcat container.
We can see this by running:
/usr/local/cpanel/scripts/ea-podman running

At this point, you should be able to see the contents of the index.jsp we created earlier by entering this web address in the browser:
http://Server-IP:TomcatHTTPPort/index.jsp
E.g.: http://69.61.102.92:10000/index.jsp
Steps to view Java applications via domain web addresses
Log into the server via SSH, now as root:
You must create these two directories, where /user/domain must be replaced by the cPanel user and their domain.
mkdir -p /etc/apache2/conf.d/userdata/std/2_4/user/domain/
mkdir -p /etc/apache2/conf.d/userdata/ssl/2_4/user/domain/
Then create the custom.conf file in the first directory created (be careful with /user/domain):
nano /etc/apache2/conf.d/userdata/std/2_4/user/domain/custom.conf
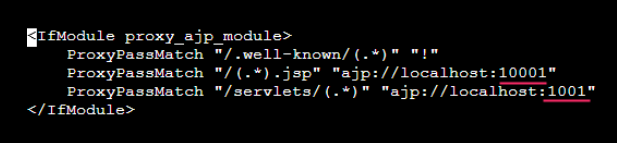
In this file we must add the following proxy, replacing 10001 with the second port returned by the command: /usr/local/cpanel/scripts/ea-podman running
<IfModule proxy_ajp_module>
    ProxyPassMatch " /.well-known/(.*)" "!"
    ProxyPassMatch "/(.*).jsp" "ajp://localhost:10001"
    ProxyPassMatch "/servlets/(.*)" "ajp://localhost:10001"
</IfModule>
Then, create a symlink from this file to the second path we created above.
Remember to replace /user/domain with the cPanel user and their domain.
ln -s /etc/apache2/conf.d/userdata/std/2_4/user/domain/custom.conf /etc/apache2/conf.d/userdata/ssl/2_4/user/domain/custom.conf
With that done, rebuild the httpd.conf file by running this:
/usr/local/cpanel/scripts/rebuildhttpdconf
It should not throw any errors.
If it finds an error it could be in the code of the custom.conf file you created.
Finally, restart Apache:
service httpd restart
You should be able to see the index.jsp using the regular domain: http://domain/index.jsp
Automatic redirection to HTTPS
First, install SSL on the account using AutoSSL, as you normally do.
If the domain works with https://domain we can proceed with the automatic redirection.
You will need to edit the server.xml file in the conf directory of Tomcat:
usuarioCpanel/ea-podman.d/nombre-de-container/conf
In the server.xml file find the line:
<Connector port="8080" protocol="HTTP/1.1"
On that line add: redirectPort="443"
The line will look like the image:

Then, add this code to the web.xml file of the application path at:\n/usuario/ea-podman.d/nombre-de-container/webapps/ROOT/WEB-INF
<security-constraint>
 <web-resource-collection>
 <web-resource-name>Entire Application</web-resource-name>
 <url-pattern>/*</url-pattern>
 </web-resource-collection>
 <user-data-constraint>
 <transport-guarantee>CONFIDENTIAL</transport-guarantee>
 </user-data-constraint>
</security-constraint>
Finally restart the user’s Tomcat container:
/usr/local/cpanel/scripts/ea-podman restart nombre-de-container
If you try the domain or application without https it should automatically redirect to the https version.
That’s all regarding the Tomcat installation itself.
Useful Commands:
This command, executed as the cPanel user, will remove the installed Tomcat container:
Replace nombre-de-container with the installed container name.
/usr/local/cpanel/scripts/ea-podman uninstall nombre-de-container --verify
These commands will show the Status, start, restart or stop the Tomcat container:
/usr/local/cpanel/scripts/ea-podman status nombre-de-container
/usr/local/cpanel/scripts/ea-podman start nombre-de-container
/usr/local/cpanel/scripts/ea-podman restart nombre-de-container
/usr/local/cpanel/scripts/ea-podman stop nombre-de-container
With this command you can run certain commands as root quickly:
/usr/local/cpanel/scripts/ea-podman bash nombre-de-container
How to modify Tomcat variables (like memory xms/xmx)
Connect via SSH as the cPanel user.
Run this command to be able to edit files as root temporarily:
/usr/local/cpanel/scripts/ea-podman bash nombre-de-container
You will need to install vim, vi, nano or some file editor:
apt update
apt install vim
or
apt install nano
You should be in /usr/local/tomcat. Enter the bin subdirectory \nand edit the catalina.sh file with vim or the installed editor:
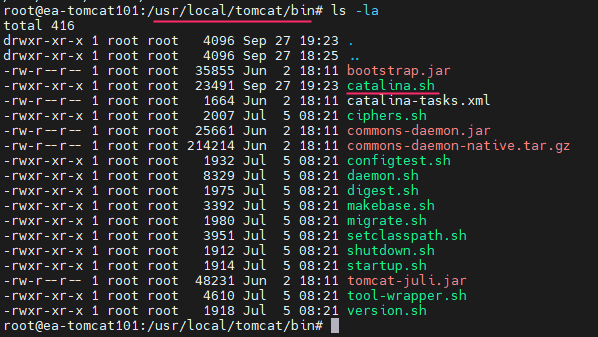
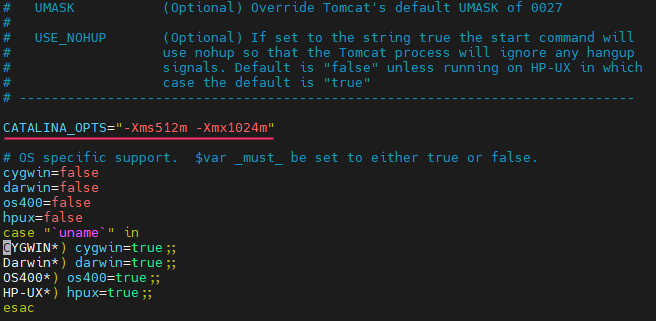
Add the following line below the commented block:
CATALINA_OPTS="-Xms512m -Xmx1024m"
After saving the change in the catalina.sh file, exit the temporary root mode with:
exit
Restart the container ensuring you are again in the cpanel user mode:
/usr/local/cpanel/scripts/ea-podman restart nombre-de-container
Check the status of Tomcat:
/usr/local/cpanel/scripts/ea-podman status nombre-de-container
Then verify that the change was applied with the command:
ps aux |grep tomcat |grep Xmx
